Updating to the New Olark - FAQ
Welcome to the next generation of Olark! We understand you may have some questions about the new experience so we’ve created this handy FAQ to help.
FAQ
Will the new version cost me anything additional?
No! There is no additional cost.
Do I need to make any settings or chatbox changes?
Nope. Your current chatbox, routing, integrations, and other settings will remain the same.
What’s Different?
The new experience has a few differences. Here’s a quick overview:
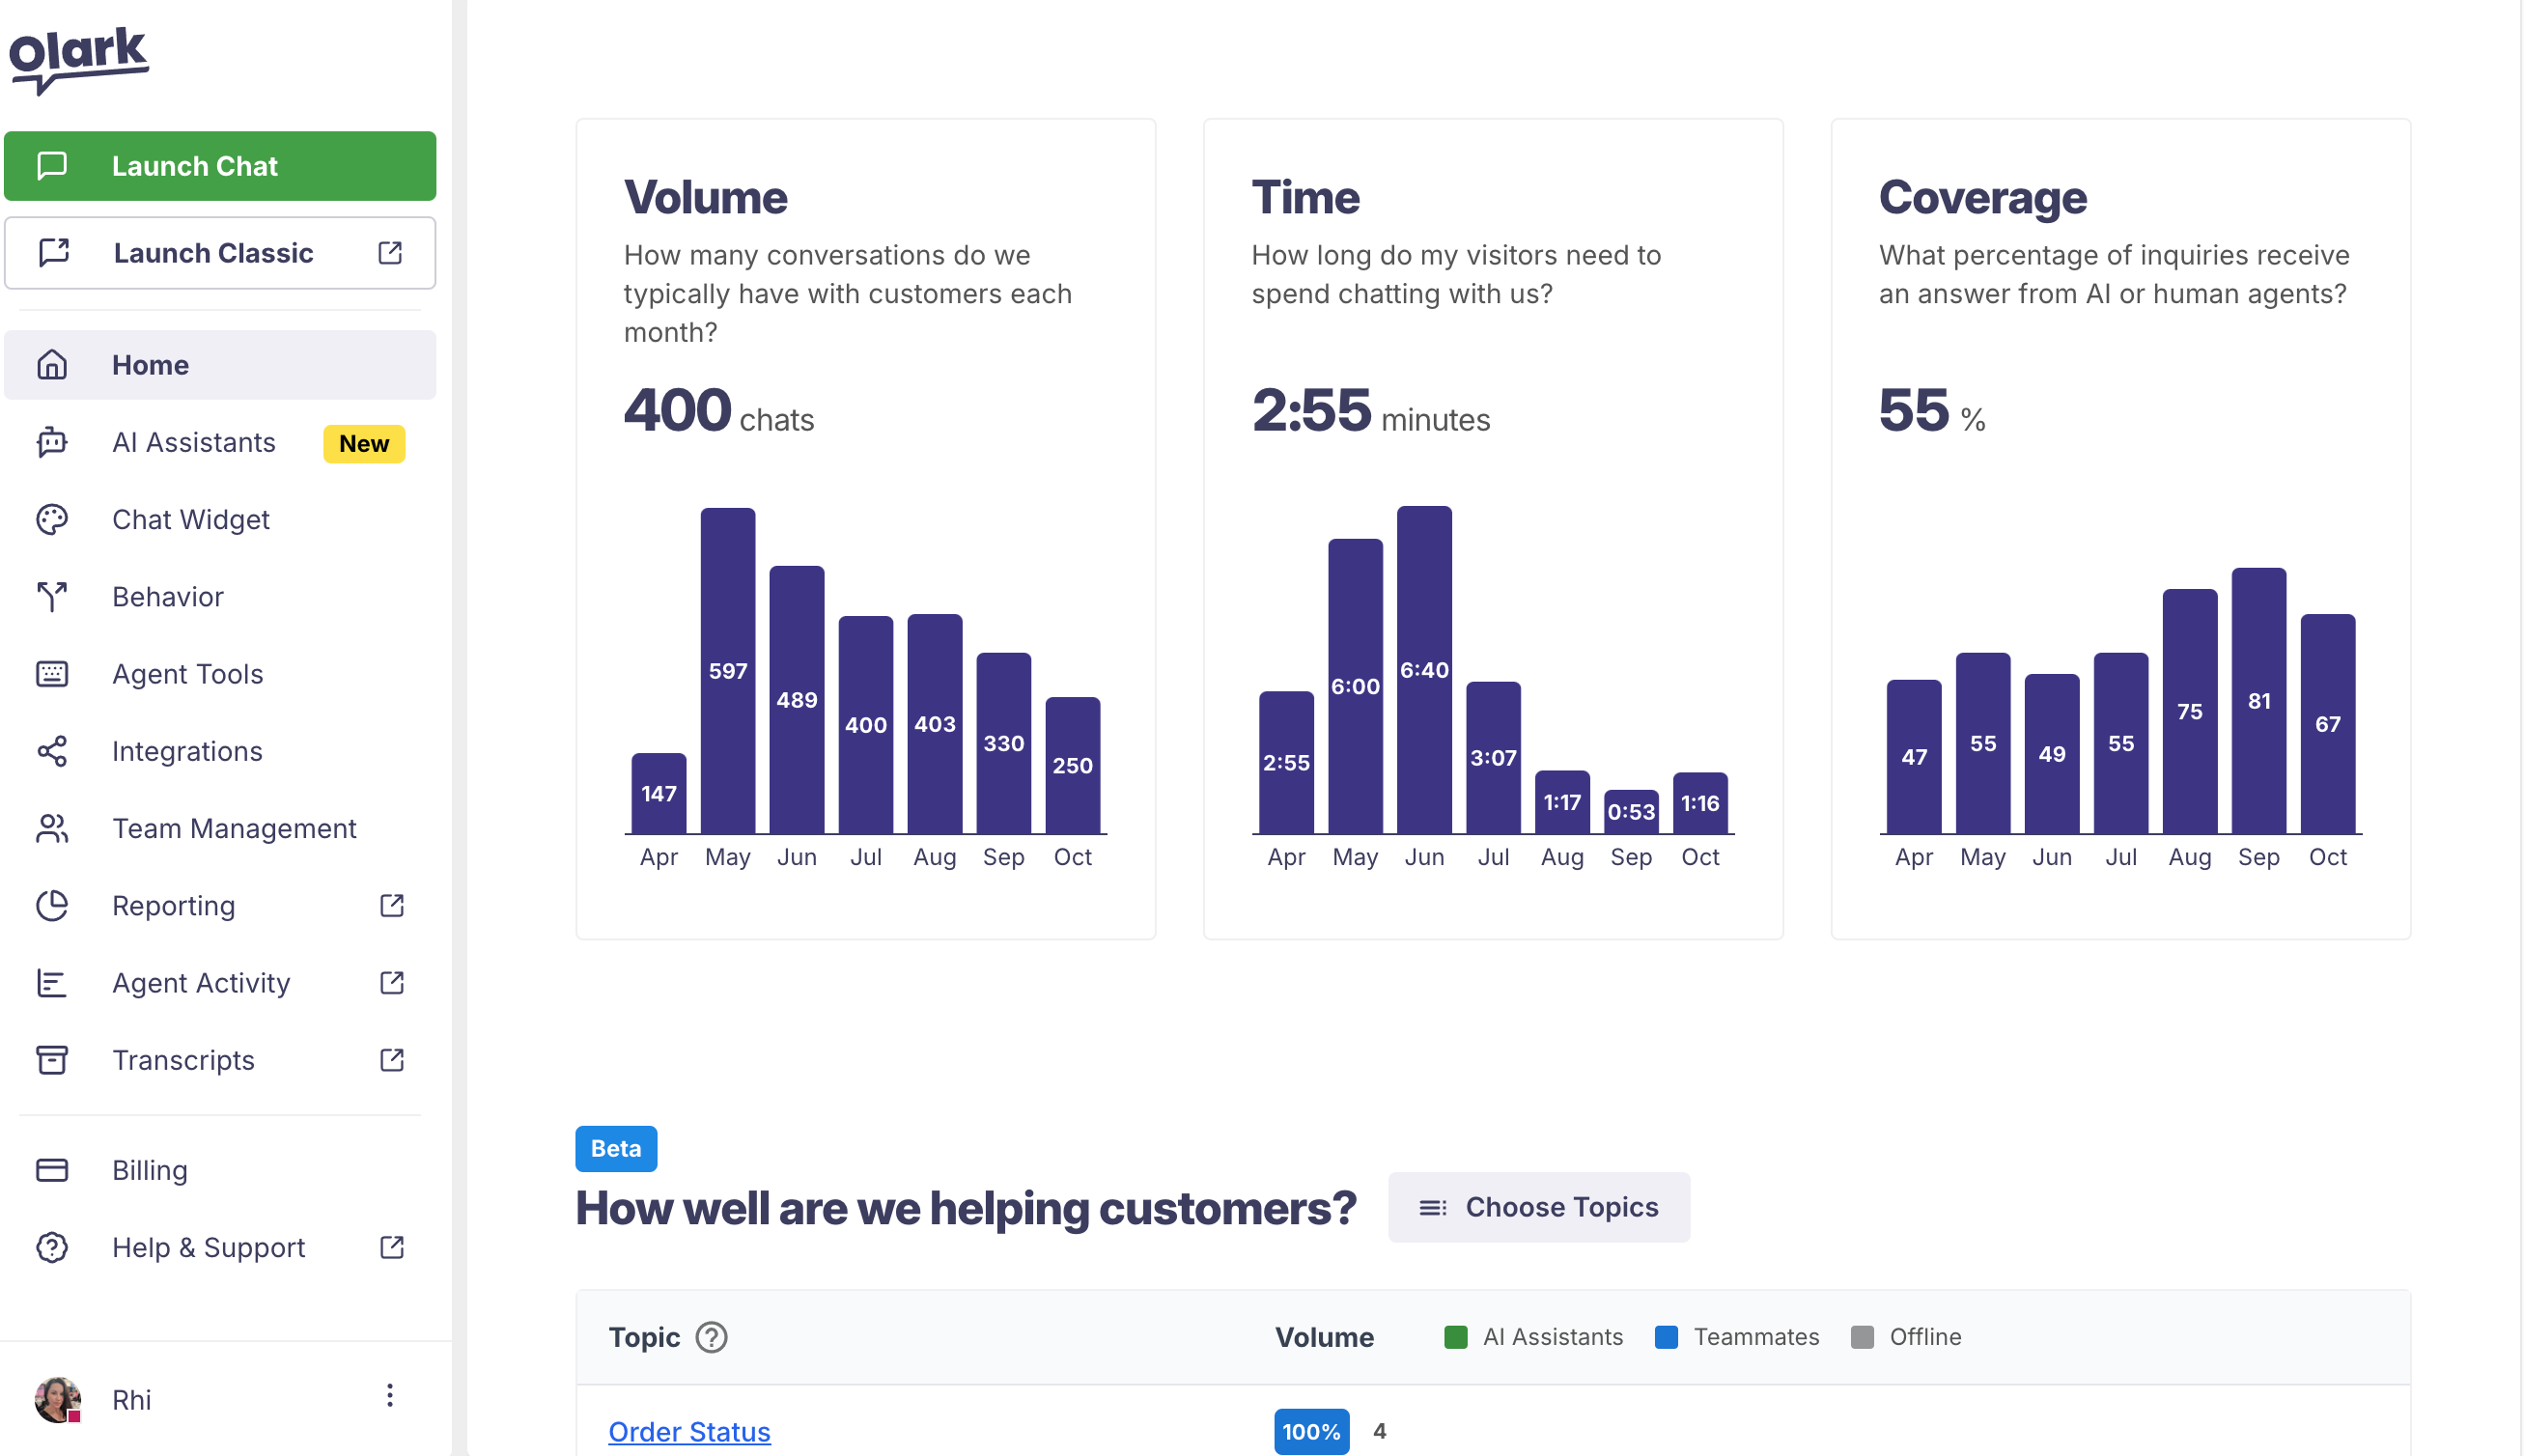
Dashboard & Admin Section
Administrators will see the admin section when they first log in. Menus down the left side of the screen take you to your settings and configuration options.
- Launch Chat will launch the chat interface. If you're an Olark Classic Chat user you may have a Launch Classic button that opens Classic Chat.
- Home is the new dashboard. It includes various reports and metrics.
- The AI Assistants section is where you can create, train, and manage bots for your site. More information on that can be found here.
- The Chat Widget section contains all the chatbox configuration tools and installation information.
- Behavior is where you'll set chat routing, plus transcript and follow up emails.
- Agent Tools contains team shortcut & tags controls.
- Integrations is where you'll set up and configure 3rd party integrations with your CRM and other applications.
- The Team Management page is where you invite agents and configure groups.
- Reporting will take you to the Olark Classic reporting page.
- Agent Activity will take you to the Olark Classic Agent Activity reporting page.
- Transcripts will take you to the Olark Classic transcripts page.
- Billing opens the billing interface where you can update your payment card and see your subscription information. (Pro accounts should reach out to their Account Manager for account and billing questions.)
- Help & Support will take you to the Olark Help Center where you can search our help topics, start a chat or submit a ticket with our support team.
Chat Interface
Teams still using our Classic Chat interface will be directed there when clicking Launch Classic.
Teams using the new chat interface will see all the latest when clicking Launch Chat:

- Toggle the Status button to set yourself to available or away.
- My Inbox is where all your chats will populate. If you’re on round robin routing, this will be chats assigned to you. If you’re on all agents routing this will be all chats assigned to you and notifications of any new chats you’re eligible to claim.
Each chat will create a card in the middle column. When the chat is complete, press the archive icon to remove the chat from your inbox. (Don’t worry, if the chat restarts the chat will be added back to your inbox automatically.)

- Team Inbox shows all the active chats that your team is engaged in.
- Recent Contacts shows all recent chats that have ended.
- Website Contacts are the visitors browsing your website.
- If your account has bots or other channels you may find additional filter views here. If you have questions about any of the views, please reach out to our support team and we’ll help clarify.
All the settings have moved! How do I…
Change profile settings and individual agent preferences
Access your user settings by clicking on your name in the lower left corner and choosing User Settings from the menu

Here you’ll find controls for the following:
- Display name
- Change password
- Change email
- Set your timezone
- Update your agent profile photo
- Set your notification alert sound and volume
- Switch between light and dark theme
- Enable automatic translation of incoming chats and set your preferred language
- Option to automatically dismiss in-app notifications
- Edit your individual shortcuts

Change my chatbox configuration & text
From the chat interface, click the Settings (gear) icon in the navigation menu. Click the Chat Widget menu to configure the following:
- Chatbox color, theme, and position on your website
- Chat button options and text
- Enable chat ratings
- Default chatbox language
- Headings and static text in the chatbox
- Prechat and offline message forms
- Add a list of allowed subdomains if your website requires it
You’ll also find your installation code and site ID string here
Edit team-wide shortcuts
From the chat interface, click the Settings (gear) icon in the navigation menu. Choose the Agent Tools menu.
Update chat and transcript routing
From the chat interface, click the Settings (gear) icon in the navigation menu. Choose the Behavior menu.
Edit agents and groups
From the chat interface, click the Settings (gear) icon in the navigation menu. Choose the Team Management menu.
Configure integrations
From the chat interface, click the Settings (gear) icon in the navigation menu. Choose the Integrations menu.
Update my payment card
From the chat interface, click the Settings (gear) icon in the left navigation bar. Choose the Billing menu.
You’ll be taken to our Stripe billing page where you can view your current subscription information and update credit card details.
Change my Automation Rules
If you were an Olark Classic user and have legacy automation rules in place, you can still access them. From the chat interface, click the Settings (gear) icon in the navigation bar. Choose Behavior in the navigation menu and scroll to the Advanced section.
Get notifications to work
You'll want to ensure your browser settings are set to allow both notifications and sound for app.olark.com. Our help article will walk you through the steps.
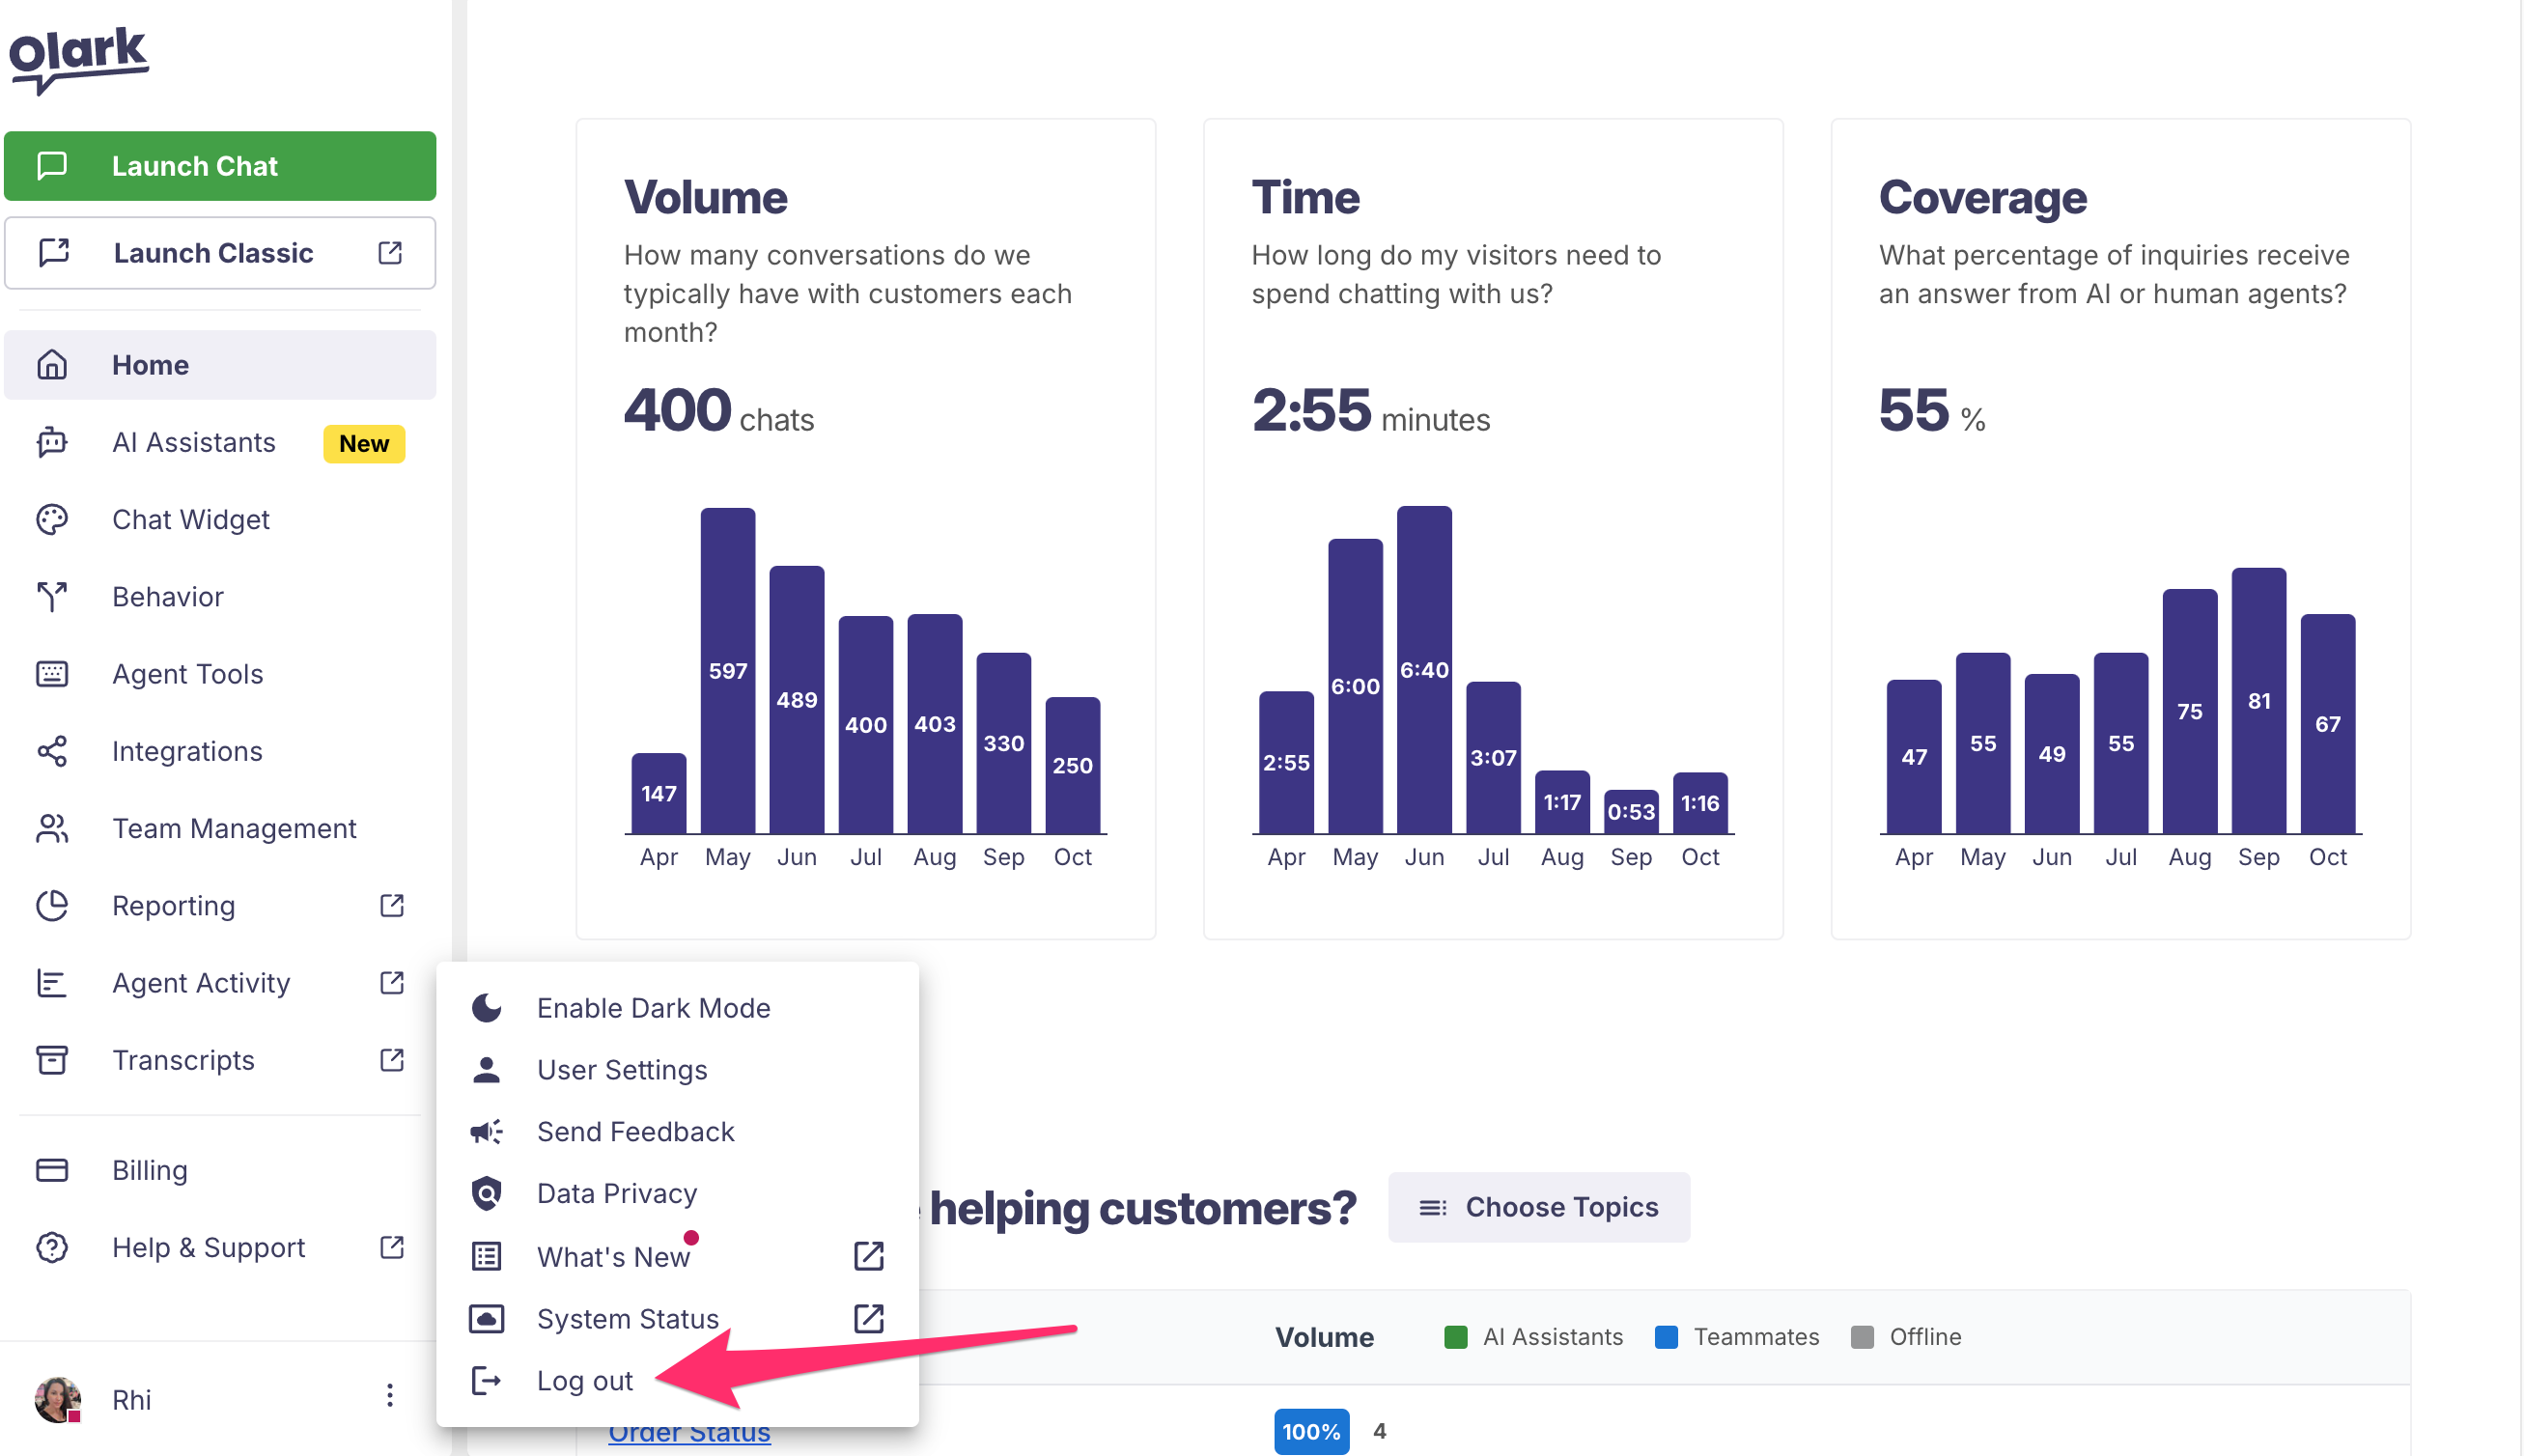
Log out
Click your name in the lower left corner and choose Log Out