Salesforce Integration Guide
NOTE: This help article is intended for customers on our self-serve level of service. If you are an Olark Pro customer, your integration likely will work differently. Please reach out to pro@olark.com for help with setting up your integration.
Creating leads and cases
You can create leads or cases in your Salesforce CRM simply by using the !salesforce lead or !salesforce case command while chatting with a visitor via Olark or configure your settings to have all chats sent automatically. Typing !salesforce by itself will create either a lead or a case based on your settings for default behavior set on your Saleforce integration page.
Olark will associate a lead or case with existing information as long as the email address for the visitor in Olark matches their email address in Salesforce. You can use our Pre-Chat Survey to collect visitor information before they start chatting, our !email command, or you can push known data about your visitor to Olark automatically via our API.
Important: In order to use the Salesforce integration, you need to be using either their Enterprise or Unlimited plan options. Professional Plan users will need to unlock Web Services API capabilities within Salesforce before being able to use the Salesforce integration. We suggest contacting Salesforce to discuss which plan option is best for your organization.
Connect Olark to Salesforce
Follow these easy steps to connect Olark to Salesforce.
- Log into Olark and go to your Salesforce integration page. Click Connect to be taken to your secure Salesforce login page. Enter your Salesforce Admin account credentials and log in. As soon as you connect, we send you a test case.
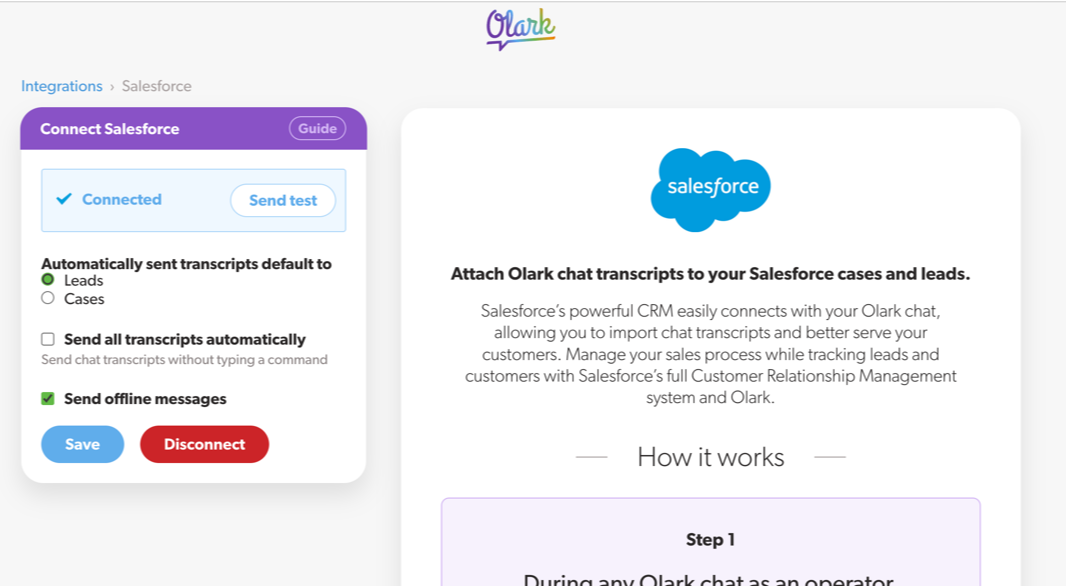
- Once connected, you will see your options for configuring your Salesforce integration through Olark. You can choose to send all interactions to Salesforce as the type you choose on this page, or you can choose to manually select which cases to send while chatting via the !salesforce lead or !salesforce case commands.
- You can also send a test as either a lead or a case by selecting the one you want, saving, and then clicking on the Send test button.
Viewing Leads and Cases in Salesforce
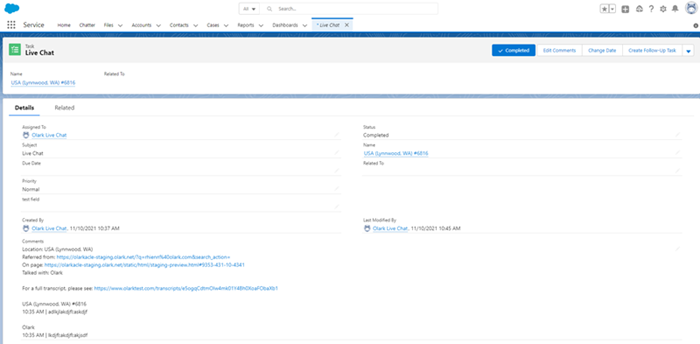
- You can view the data you send from Olark in the Salesforce Dashboard, under the Leads and/or Cases sections.


This is how a chat transcript might look within Salesforce.
Salesforce Fields
Here is a list of the fields Olark sends to Salesforce.
For leads:
- Visitor_name
- Visitor_phone_number
- Transcript - the content of the chat transcript or offline message
- Visitor_email
- Operator_id - we attempt to attach the ticket to the email address of the agent currently taking the chat or if that’s not possible, we send it as an unassigned ticket
- Description - the first 8 lines of the chat transcript or the subject line of the offline message, which is attached as a task
- Subject - the name of the lead
- State
- Country
- Leadsource - live chat
For cases:
- Visitor_name
- Visitor_phone_number
- Transcript - the content of the chat transcript or offline message
- Visitor_email
- Operator_id - we attempt to attach the ticket to the email address of the agent currently taking the chat or if that’s not possible, we send it as an unassigned ticket
- Description (the first 8 lines of the chat transcript or the subject line of the offline message)
- Subject ("Olark chat with"...)
- Origin - email for offine messages or web for chats
Common Problems
“No such column 'Description' on subject of type Lead”
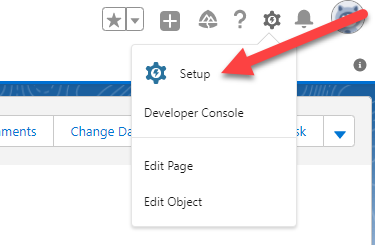
Olark sends a “Description” field. If this not set up on your lead records, you will see the error listed above. Try adding "Description" as a field under your Lead record type template. To do that.
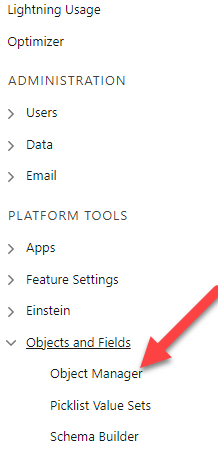
- Go to Setup
- In the left sidebar under Platform Tools click on Objects and Fields. Choose Object Manager.
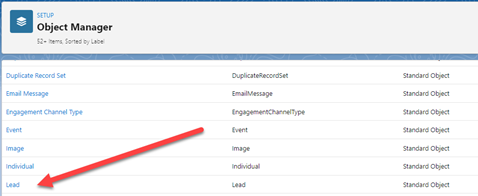
- Once you are on the Object Manager page, scroll down and select Lead.
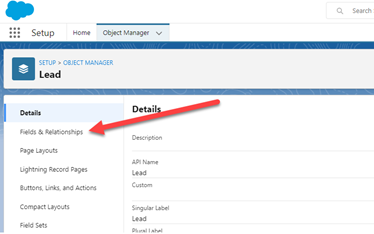
- After selecting Lead, click on Fields & Relationships.
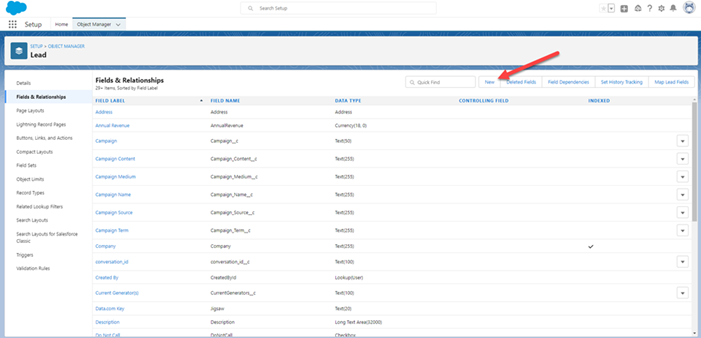
- After selecting Fields and Relationships, click on New.
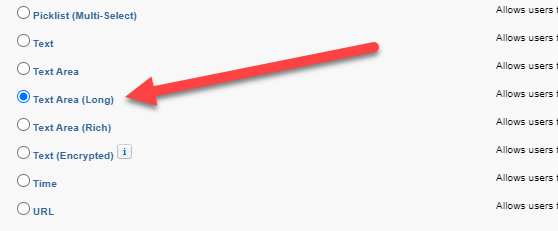
- Scroll down, choose Text Area (Long), and click Next.
- Change the field label to Description and choose the number of lines you want to show visible.
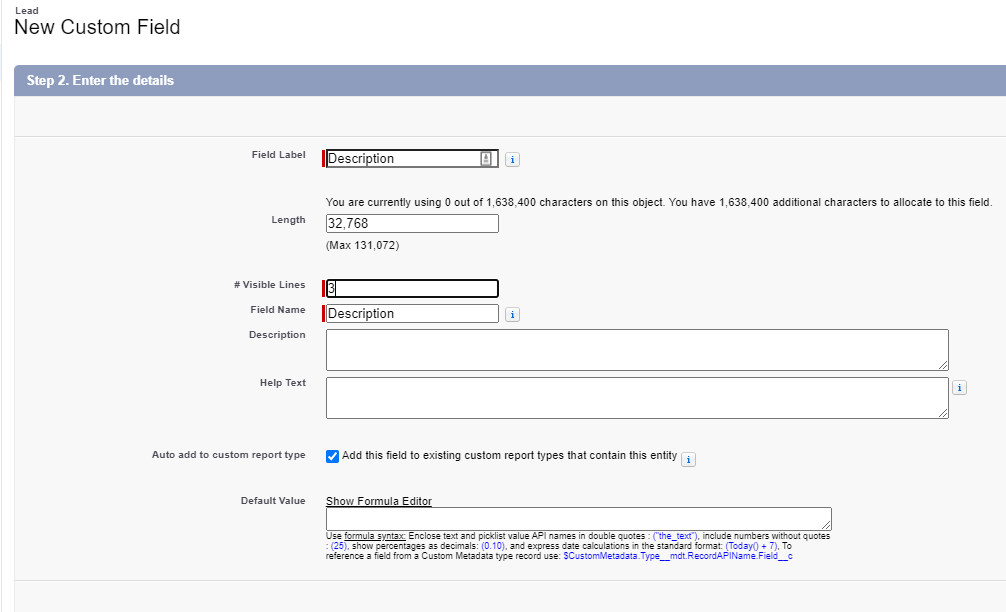
- Set the access and layout levels appropriate for your version of Salesforce (your default ones will be already picked). Once your options have been selected, click on Save. Now your lead has a description column, and the issue should be resolved!
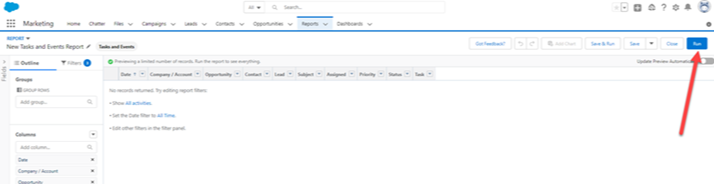
Leads in Salesforce Doesn't Match the Number of Chats in Olark
New Leads are created with a Task containing the chat attached to it. However, each new chat for an existing Lead is simply attached as a new Task for that existing Lead. To find all the chats sent by Olark as Leads, you'll want to follow these steps.
- Go to the Reports tab.

- Click on New Report.

- Click on Activities and then click on Tasks and Events.

- Customize your report as needed and then click on 'Run.' All the results from 'Live Chat' will be from Olark.